
Over the years, nail care and nail arts have changed dramatically. Innovative techniques and products are now available to help achieve salon-quality manicures at home. Semi-cured gel nails are one of the most exciting advances in this field. This guide will explain what semi-cured nails are, how they work, the application process, and their removal. It also explains its benefits.
What are Semi-Cured Gel Nails?
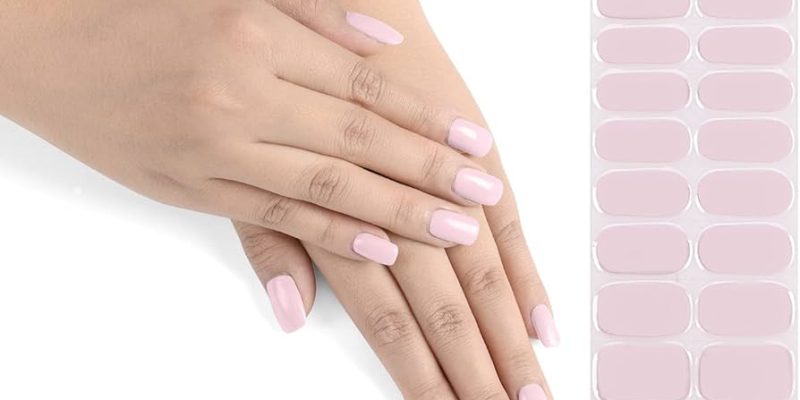
Semi-cured Gel Nails are a hybrid of traditional gel nails and sticker nails. These are pre-made gel nails that are only partially cured (usually between 60-70%), making them flexible and easy to use. Semi-cured gel nail strips require a UV/LED light to cure, unlike regular nail stickers. This ensures a glossy and durable finish that can last for up to two weeks.
Semi-cured Gel Nails: Benefits
- Easy application: Semi cured gel nails are made for simplicity. The nails come in different sizes to suit various nail shapes. They are also easy to apply and suitable for beginners or those who like DIY manicures.
- Long-Lasting When applied properly and cured, gel nails that are semi-cured can last for up to two full weeks without peeling or chipping. This is a better alternative to regular nail varnish.
- A Variety of Designs These nails are available in a variety of colors and designs. They range from elegant and classic to trendy and bold. This allows the user to experiment with a variety of styles without needing intricate nail art skills.
- Cost Effective: Semi cured gel nails are a cost effective solution to achieve salon-quality nails in the comfort of your own home. The nails are a great alternative to frequent salon visits. They save both time and money.
- Safe For Nails With the proper application and removal of semi-cured gels, natural nails will be less damaged than traditional acrylic or gel nails. These nails don’t need harsh chemicals or excessive file, which could weaken your nails.
How to apply semi-cured gel nails
Materials Required:
- Semi-cured gel nail strips
- UV/LED Nail Lamp
- Nail file
- Cuticle pusher
- Nail buffer
- Alcohol Wipes or Nail Cleansers
- Scissors
- Top coat (optional).
The Step-by-Step Applicant Process
- Preparation:
- Clean & Trim: Begin with dry, clean nails. Use a nail file to trim and shape your nails.
- Push back Cuticles Use a cuticle tool to gently push the cuticles back, creating a smooth base for application.
- Buff & Cleanse : Gently buff your nails to remove shine and then clean with a nail cleanser or alcohol wipe.
- Selecting the Right Size
- Select the gel strips with semi-cure that fit your nails best. Trim the sides of the gel strips if necessary to get a perfect fit.
- Gel Strips:
- Remove the backing of the gel strip. Carefully place the strip on your nail starting at the cuticle, pressing toward the tip. Use your fingertips or a cuticle tool to smooth out any air bubbles and wrinkles.
- Excess:
- Remove any excess nail strip with a nail file. File downward to avoid lifting.
- Cure under UV/LED Lamp
- To fully harden your gel, place your nails under the UV/LED light for the recommended time (30-60 seconds). This step is essential for the durability and longevity of the nails.
- Optional top Coat
- Apply a top coat of gel for added protection and shine. Cure again under the LED/UV lamp.
How to Maintain Semi-Cured Gel Nails
- Avoid excessive water exposure: Prolonged contact with water can cause the gel strips lift. When doing household chores, or washing dishes, wear gloves.
- Moisturize regularly: Keep the hands and cuticles moisturized to maintain overall nail health. Dry cuticles may cause the gel strips to lift and peel.
- Avoid Harsh Chemicals : Avoid harsh chemicals like acetone, chlorine, and cleaning agents that are strong. These can damage the gel strips.
- Be gentle: Take care of your nails. Avoid using your nails as a tool to open cans, or scratch surfaces. This can lead to chipping and peeling.
Remove Semi-Cured Gel Nails
It is important to remove semi-cured gel nail properly to avoid damaging your natural nails. Here’s a safe way to remove gel nails:
- Soak warm water
- To loosen adhesive, soak your nails for 10-15 minutes in warm soapy water. This step makes the removal process less painful and more gentle.
- Gently peel off
- Start by lifting and peeling the gel strips. If you have difficulty, soak your nail a little longer.
- Buff & Cleanse
- After removing the strips, gently buff your nails in order to remove any residue. Use an alcohol wipe to clean your nails or nail cleaner.
- Moisturize:
- After removing your nails, apply cuticle oil or hand cream to moisturise the cuticles and nails.
Conclusion
Semi-cured gel nail offers a convenient and innovative way to get professional-looking nails in the comfort of your own home. They are popular among nail enthusiasts because of their easy application, long-lasting effects, and wide range of designs. You can achieve salon-quality nails at home by following the right application, maintenance and removal techniques. Semi-cured gel nails are a cost-effective and versatile solution to all of your nail art requirements, whether you want a classic French mani or bold, trendy designs.


Comments