
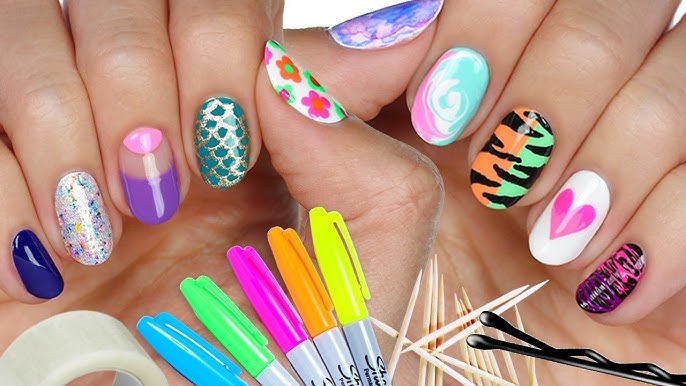
We love to get our nails done at the salon but budgets and time are sometimes an issue. There are many easy nail designs you can recreate at home. Even if you are a novice, it’s possible to create nail art.
Trust. It’s not necessary to be a nail artist or have a steady, fluid hand to elevate your manicure. It’s easy to create a manicure with simple lines, dots and nail stickers.
We found 20 easy-to-do nail designs to help you narrow your choices. Micro French tips, mismatched nails, funky stickers and squiggly line are just some of the nail designs that we found. Three nail professionals share their tips and tricks. Continue scrolling to learn more.
1. Wavy Reds
Jordan Meade is a Glamsquad nail artist. She says that this look requires “minimal effort, but maximum design.” This abstract line design is like art on your nail. It gives off a simple but alluring look. Meade’s tips include: “Applying a thin layer of polish using a lighter shade and curing for 60 seconds is a great way to start.” Use a fine detail paintbrush and the color of your choice to create random, freestyled spiral lines with varying thickness. Art is subjective and not perfect.
2. White Stripes
Less is more in this case. These neutral nails are so simple with the thin white line down the middle. Amy Oung, a nail artist says to apply one or two coats of a neutral/naked color as a base. Once it has dried, take a striping tool and create a thin vertical line in a nice white. To lock in the design, apply gloss (SpaRitual Fast Dry Vegan Top Coat $20).
3. Statement Star
Who doesn’t like a classic, red manicure? Add a star to the ring-finger for a little extra flair. You can use this 10-Piece Nail Art Brush Set (9) or another similar set to create stars and other details.
4. Shimmering Tips
Gold at the tip of your nails will add a touch of glamour to bare nails. Try a metallic chunky shade such as L’Oreal’s Color Riche Nail in Gold Dust ($6). Combine with gold jewelry for a bold look.
5. Pastel Mismatch
The pastel vibe is always a favorite and the fact that there are so many shades to choose from makes it even more appealing. For a polished look, mirror the order of colors on both hands.
6. Golden Stripes
This nail art looks almost too simple. This nail art features stripes on top of half-painted fingers, which can be used as inspiration to help your manicure last longer. If you have mastered design #02, then you are on your way to creating this one,” says Oung.
Do one coat of clear nail polish.
“After it has dried, paint half the nail with an opaque pastel color (SpaRitual Vegan Color, $14 in Poetry in Movement). Take a small amount of product and spread it out on your nail. The Nourishing brush is curved so that it creates a moon-shaped effect. Brush evenly over the nail. If necessary, repeat the second coat.
Once the polish is dry, paint a thin line vertically down the middle of the nail with a metallic colour using a stripingbrush. We like FingerPaints’s Striping Polish in Brushstroke Of Bril, $4.
Once the design is dry, seal it in with a clearcoat.
7. Starry Details
Nail stickers are the perfect solution for those who want to do nail art, but have shaky hands. Olive & June Nail Art Stickers are a great way to create a unique, easy manicure. We’re pretty impressed.
8. Gilded Half Moons
This chic design combines metallic gold and teal. Oung says to paint two coats of a teal opaque color. After it has dried, paint a half-moon around the cuticle with a metallic colour using a detailer brush. Start by painting a small metallic dot at the base of the U (the moon’s U) and two dots on either side (the “smile” of the U) of where the end of the moon will be. With the detailer’s brush, connect the dots and then fill in the rest. Let the paint dry. “Apply [a topcoat that dries quickly] to lock the design.”
9. Party Dots
This is a fun twist on the classic polka-dot nail. The fun is in the variation and overlap. Tammy Taylor suggests that to achieve this look you should first apply Flawless Foundation Gel Base Coat (32 dollars) and allow it to cure, before adding any designs. She says that she created a dotted smile in the middle of her nail using the Tammy Taylor Dotting Tool (£8), New Flame Gelegance Gel Polish (£23) and Fresh n Fruity Gelegance Gel Polish (£23), alternating the colors. Repeat this process, filling in the gaps along the nail. Cure.”
10. Colorful Lines
This neutral manicure is made fun and interesting by the colored stripes. It’s simple and easy to do, and can be used in conservative or more liberal settings. This look can be achieved even more easily with nail stripe stickers. Taylor recommends her Striper Brush ($22) for more complex shapes like curves and lines.
11. Graphic Neon
This manicure is a great way to make a statement without spending a lot of time. This simple and chic style allows you to use any metallic or neon color combination. For this manicure, or any other mani, “always use a finish coat!” emphasizes Oung.
12. Canary Yellow
This look by Paintbox is made pop with the contrast between the blue dots and yellow base. The dots are 3D but a contrast polish can also make a big impact, if you don’t want to buy extra embellishments.
13. Two-Tone Purple
This is a great example of purple on purple. For a polished and understated look, different shades of the same color are always a great choice. Try OPI’s Infinite Shimmer 2 Long-Sear Lacquer in Do You Lilac It ($14). As the base, use Nature Strong Natural Original Lacquer (13 dollars) in A Great Fig World as the stripe.
14. Blue Dots
A simple nail art hack. Use a toothpick for creating different-sized dots, like those in this Chillhouse mani. Taylor suggests applying a top coat like Glass Slipper Gel Top Coat (32 dollars) to the design after it has dried.
15. Sprinkle of Glitter
Use a sponge and press glitter on the lower left corner of your nail, letting it taper into nothing. Set the nail art with clear coat, and voila! Instant party nails.
16. Diagonal Periwinkle
This two-toned design is a great way to add a unique touch. It’s as easy as applying the first color, letting it dry, then painting the second shade diagonally across the half of the nail. Oung suggests that you first paint one or two coats of a neutral/nude color. Once dry, use a striping tool to paint a diagonal half-way across the nail in periwinkle. This baby blue reminds us of Essie Bikini so Teeny ($8). She says to fill in the remaining areas with either one or two coats of polish using the polish brush. For more control, use the long detailer brushes. “A clear coat will lock the design into place.”
17. The Sleek Swoop
You can modernize the classic manicure by moving your French tip from the center to the corner. Choose a pastel color or bolder rainbow shades. Meade notes that a base coat is not necessary for this design, as the entire flare is located at the tip. Choose five different colors, one for each nail. Then use a polish brush to create the slope. Acetone can be used to clean the curved lines with a second brush. “A simple pop of color will make you stand out.”
18. Black and white graphic
This easy nail art is perfect for those who don’t like bright colors. The thin black stripe gives the design a unique dimension.
19. Metallic Pyramids
These pyramid cuticles are a great alternative to the half-moon style. Oung’s top tip to nail the look is: “Always let the base color dry before painting on the top designs.”
20. Geometric Accents
This simple pastel manicure got a major update. To recreate this stunning style, add a triangle of foil in your favorite nail polish color. There is nothing more or less.


Comments